
ClickUp Time Tracking Best Practices for Agencies

Having clear visibility into how time is being spent across projects, clients, and other initiatives is critical. Accurate time tracking helps you analyze profitability, team productivity, workload allocation, project throughput, and much more.
Without proper time tracking, you’re flying blind and can’t make informed data-driven decisions about your business.
Thankfully, amongst countless other things, ClickUp provides a powerful solution for tracking time. And when your hierarchy and time data are solid, you can tie them into meaningful agency KPIs like utilization and profitability.
Your team may currently be tracking time in a tool like Harvest, Everhour, or Toggl (yes, these tools have their benefits) but if your team is already leveraging ClickUp, you’ll be able to cut some software costs and save yourself some cash.
However, though ClickUp provides a powerful time tracking solution, to actually obtain insightful data, three elements are necessary:
- Your ClickUp Workspace needs to be set up properly.
- Your team needs to track their time consistently and build healthy habits.
- You need to build dashboards and reports to capture and make sense of your time tracking data.
In this article, I’ll be guiding you through the process to powerful time tracking and reporting for your business. Everything here comes from real rollouts: ZenPilot is ClickUp’s first and highest-rated Solutions Partner, and we’ve helped 3,100+ clients build systems like this.
Step 1: Building Your ClickUp Hierarchy for Better Time Data
Before we even begin talking about how to track time in ClickUp and all its bells and whistles, we need to discuss your ClickUp Hierarchy first.
Why?
Your time tracking data could be meaningless with a bad Hierarchy.
If you want meaningful time data for billing, client projects, department breakdowns, and more, you need to intentionally structure your ClickUp Hierarchy.
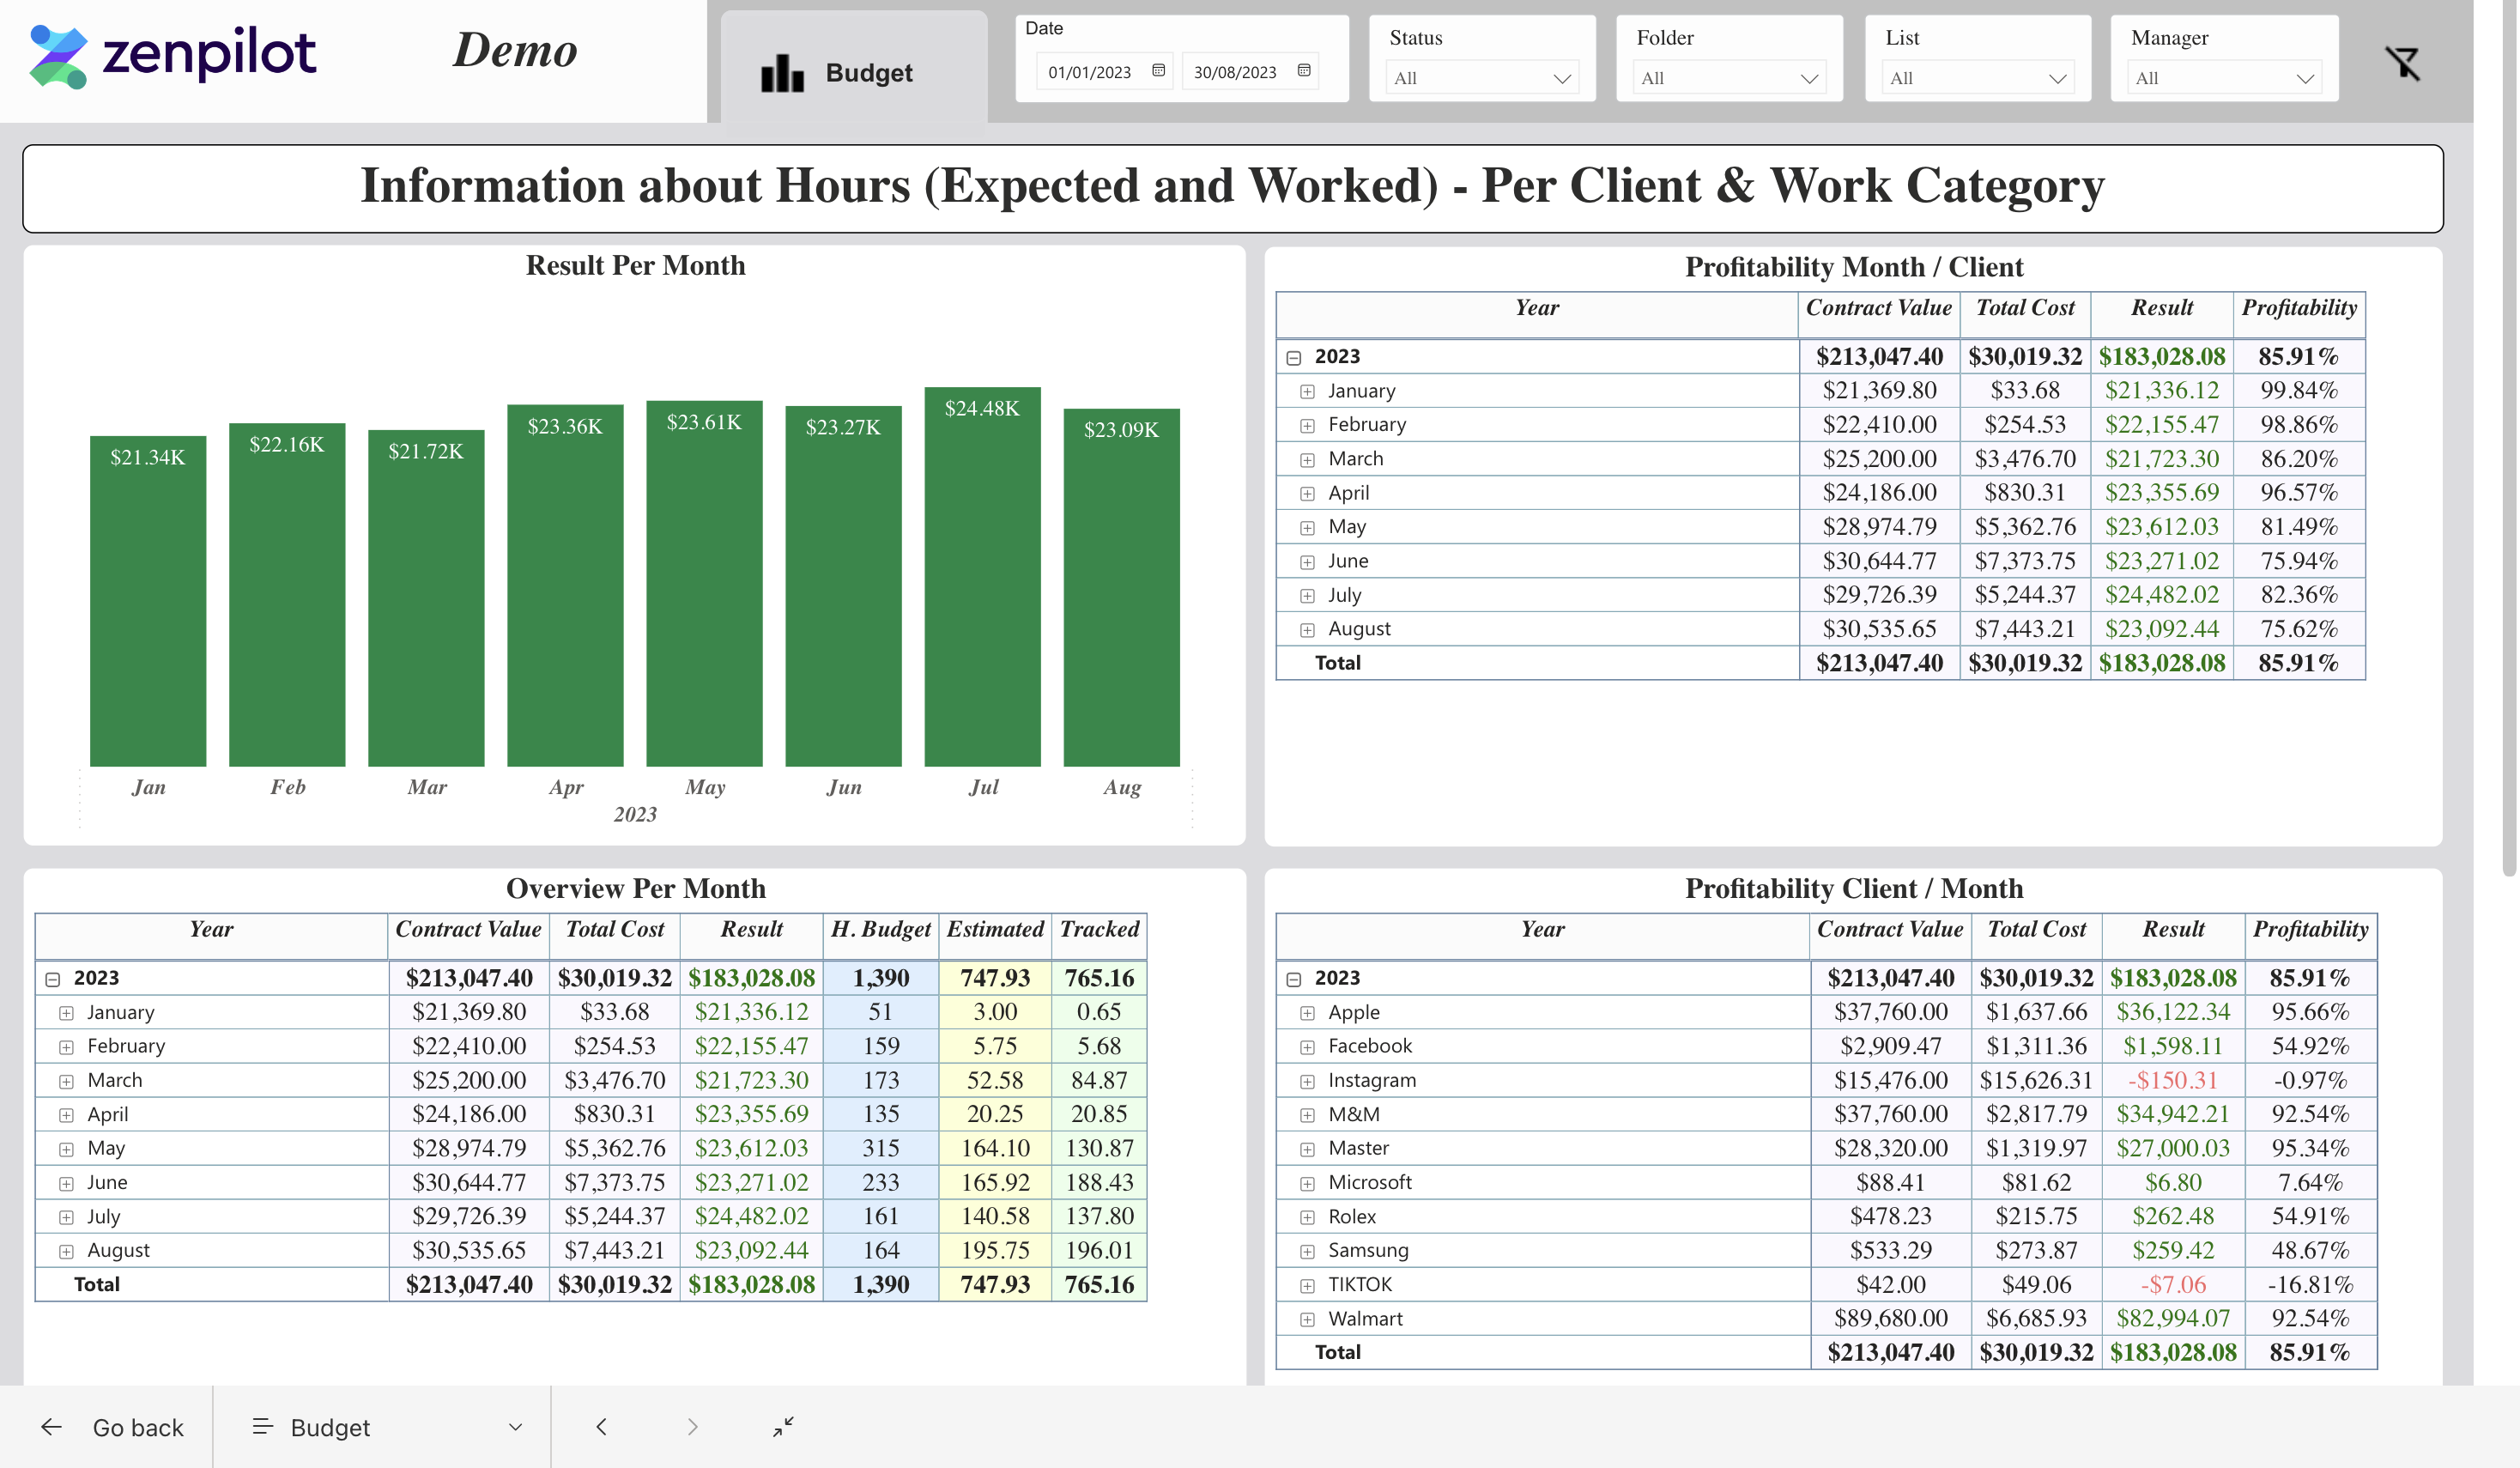
The future state could look like this - crystal clear visibility in to profitability and utilization.
In ClickUp, you’ll have a Workspace, Spaces, Folders, Lists, Parent Tasks, Subtasks, and *Checklists, and *you’ll track time at either the Parent Task and Subtask level.
These Tasks will live in List, and that List will live in a *Folder *(but note that Lists do not need to live in Folders), and that Folder will live in a Space.
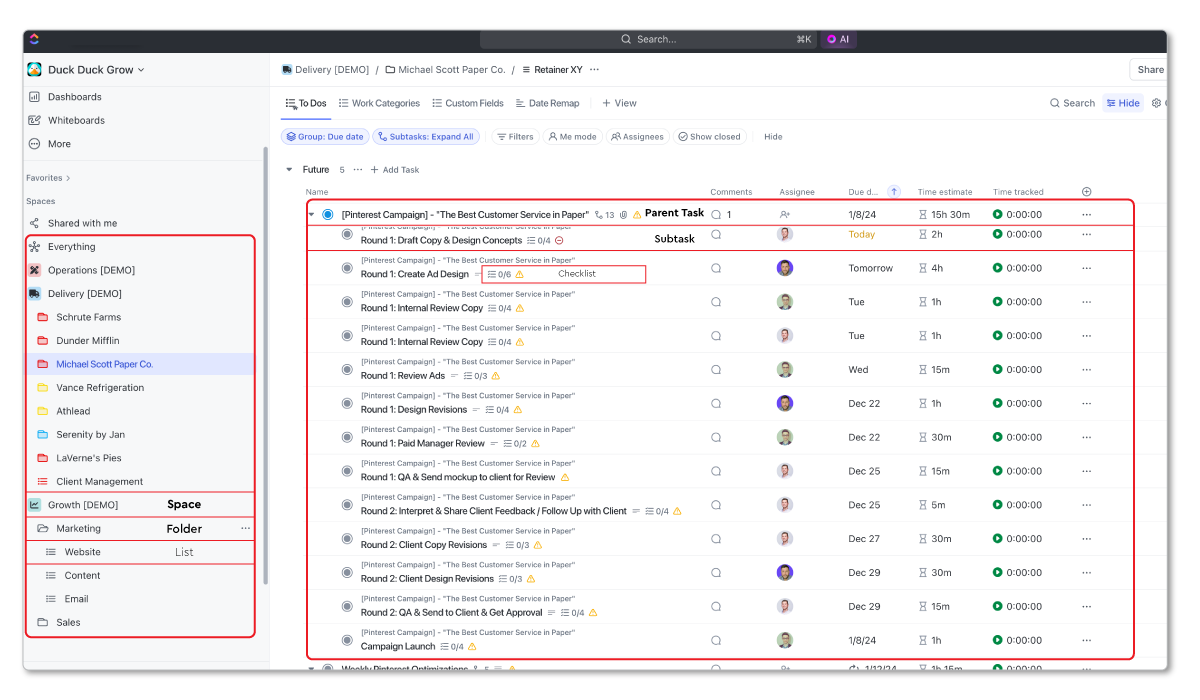
The time that’s tracked on these Tasks will be associated with the List, Folder, and Space in which they live. This is why it’s extremely important to make sure your Hierarchy is built in a way that gives you useful data to help you make decisions.
If you have a bunch of random Spaces, Folders, and Lists, with no strategic direction, your time data will reflect that, and you’ll probably get a bit frustrated…
Don’t always blame the tech. Sometimes it’s a strategy problem. 🙂
Example Hierarchy for Agencies
For agencies (or anyone servicing clients), here is an example high-level Hierarchy that’ll provide great reporting:
- Space: Growth
Folder: Sales
- Folder: Marketing
List: Website
-
List: Content
-
Space: Delivery
Folder: Client A
List: Retainer XYZ
- List: Website Project
Folder: Client B
- List: Retainer ABC
Folder: Client C
-
List: Retainer DEF
-
List: HubSpot Implementation
-
Space: Operations
Folder: HR
- Folder: Finance
- Folder: General & Admin
With this structure, time tracked on Tasks in the “Retainer XYZ” List will flow up to the “Client A” Folder and “Delivery” *Space, *time tracked on Tasks in the “Retainer ABC” *List *will flow up to the *“Client B” Folder and “Delivery” Space, *and so on…
This will then provide visibility into time across clients, contracts, projects, departments, and more.
Related: The Best ClickUp Hierarchy
Download the Complete ClickUp for Agencies Guide
The 47-page guide includes graphics, checklists, and links to how-to videos so you can actionize your ClickUp plan.
Get Instant Access →ClickUp Hierarchy Best Practices
In summary, your Hierarchy is more important than you may have originally thought.
Go in with a strategy before you implement ClickUp. You want to have a good grasp on your Hierarchy design before you start building everything in ClickUp.
Here are a few Hierarchy recommendations and thoughts:
- Your Workspace is easy. I’d recommend you only have one ClickUp Workspace to keep things simple.
- Your Spaces should be used to represent the main teams or high-level departments across your organization. (If you’re running an accounting firm, see our dedicated guide to ClickUp for accounting firms - the hierarchy recommendations differ slightly.)
- Within each Space, Folders should represent smaller departments within those larger teams (yes, this could be slightly changed based on how your team works or needs to track work).
- Your Lists should then be used to represent categories of work. This could be general service lines or be grouped by campaigns (for those internal marketing folks reading this article).
Always be thinking about visibility when you design your Hierarchy. What are you hoping to see in the future?
Spending time modeling your Hierarchy will pay dividends in the future. It’s easier to build it right the first time than it is to completely redesign it later.
If you need help with this, book a call with my team. We’ve helped 3,100+ clients streamline their operations in ClickUp, and our Blueprint process may be a perfect fit for you.
Step 2: Turning On ClickUp Time Tracking
After your Hierarchy is designed and you feel good about it, it’s time to actually turn on your time tracking capabilities in ClickUp.
Before you can start tracking time in ClickUp, you need to confirm the Time Tracking ClickApp is enabled. ClickApps add advanced functionality to ClickUp, so you need to turn them on.
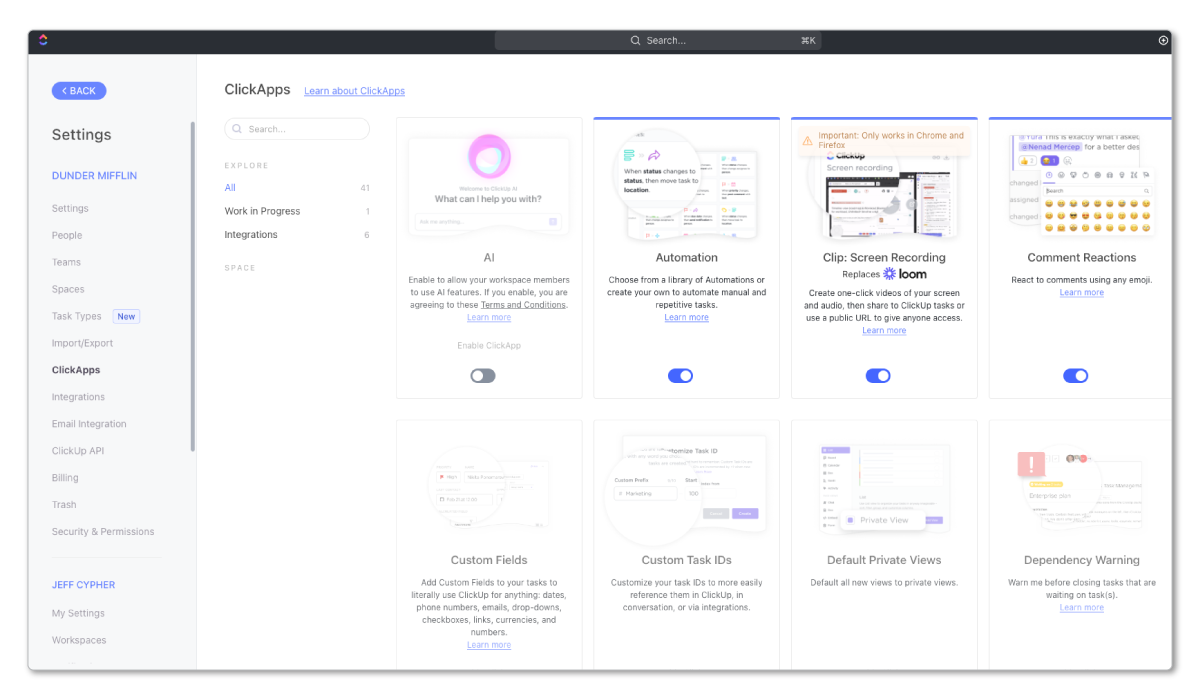
Here’s how to enable the Time Tracking ClickApp:
- Navigate to your Quick Actions Menu in the top right corner and select “ClickApps” at the bottom.
- In the search bar, type in “Time Tracking”.
- Toggle this ClickApp on for all of your ClickUp Spaces.
- I’d also recommend toggling on the Time Tracking Rollup ClickApp.
- Plus, you can turn on the* Time Estimates and Time Estimates Rollup ClickApps.*
With your Time Tracking ClickApp enabled, the time tracking functionality will now be available across your ClickUp Workspace.
Now, let’s look at where time can be tracked in ClickUp, and let me offer you a few tips to help get your team tracking time consistently.
Step 3: How and Where to Track Time in ClickUp
It’s important that your team actually has Tasks that they need to work on in ClickUp. You can’t track time without Tasks in ClickUp.
To help with this, I recommend you build all of your workflows and processes and save them as ClickUp Templates. This will help significantly with making sure your team has Tasks for them to complete and track time on.
But regardless, there’s three places where your team can track time on their Tasks…
Three Places to Track Time in ClickUp
1) List View
The most efficient way (and where I prefer) to track time is directly within a List View. Simply add a Time tracked column to your View, and you can start tracking time directly on each Task.
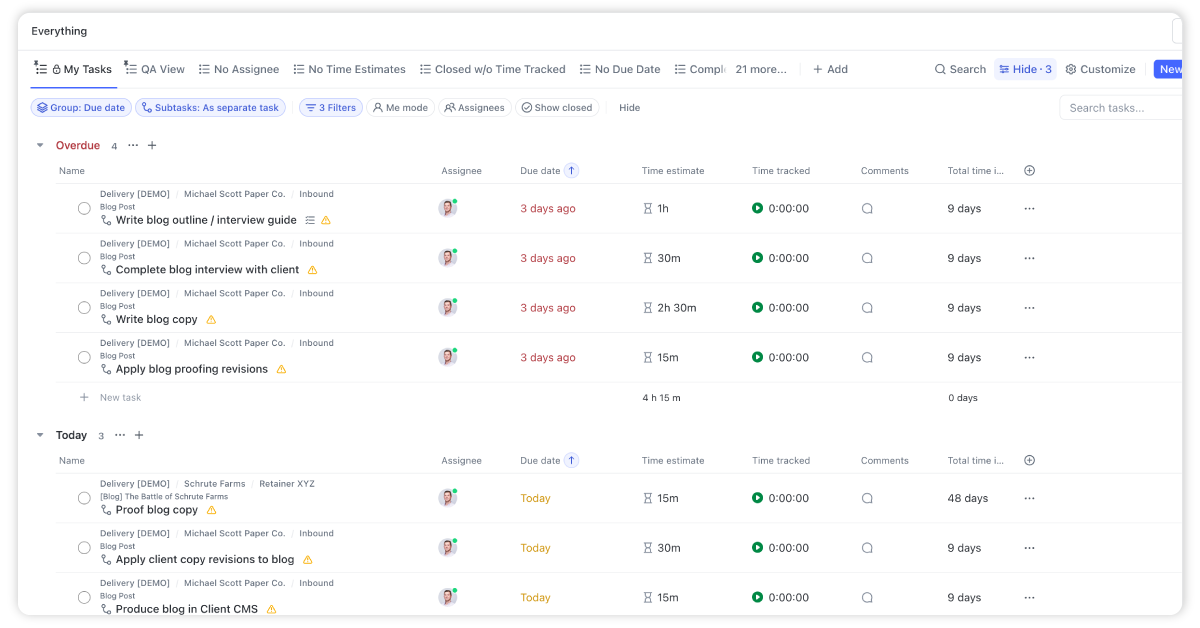
To make it easy for everyone, we recommend you create a “My Tasks” *View. This ClickUp View is built at the Everything *level and will be where everyone lives on a day-to-day basis. This View will show everyone all of their Tasks.You can see your Tasks, get the context you need to complete them, track time on them, and complete them, all in this one View. Talk about simplicity!
Here’s your instructions on building a “My Tasks” View in ClickUp.
2) Task Details
This isn’t that much different than tracking time in the Task View, but it does take one extra click (which I realize is only milliseconds in productivity loss).
This option is fine and I do it often, but sometimes I like to just track time directly in the Task View.
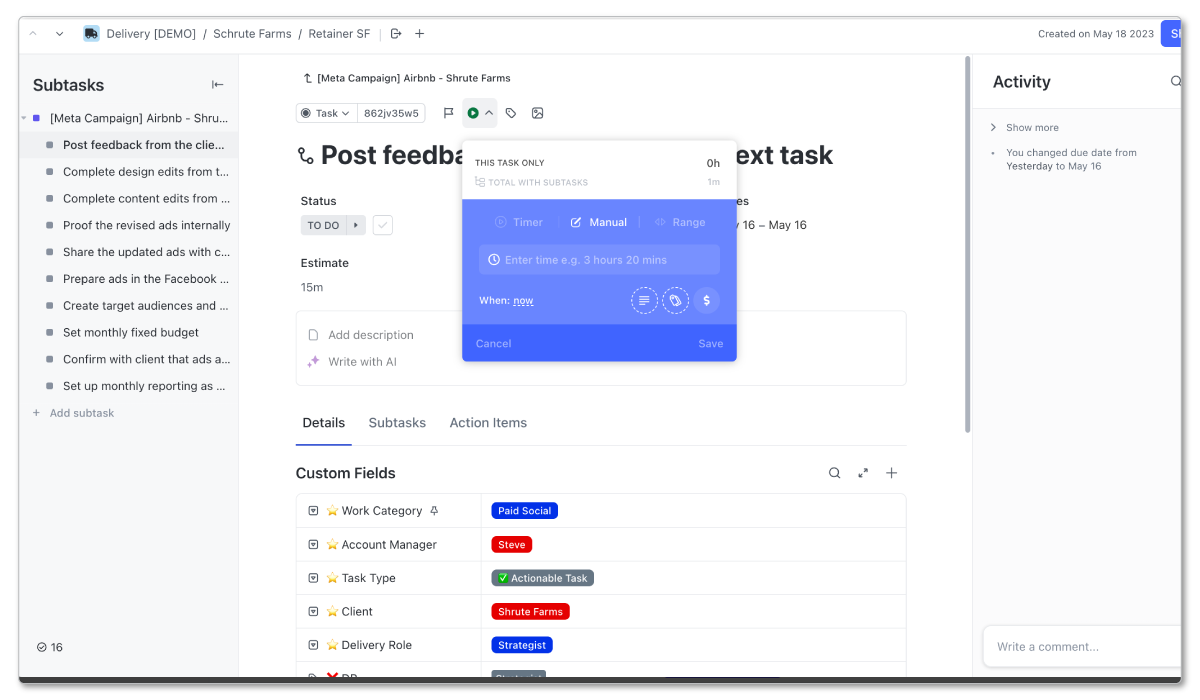
When you click in to a Task,* you’ll see a little green play button directly above the Task name. *If you hover over it it’ll say “start timer”. Click on the “start timer” and begin tracking time.
3) Quick Action Toolbar
Lastly, you can also leverage the Quick Actions Toolbar.
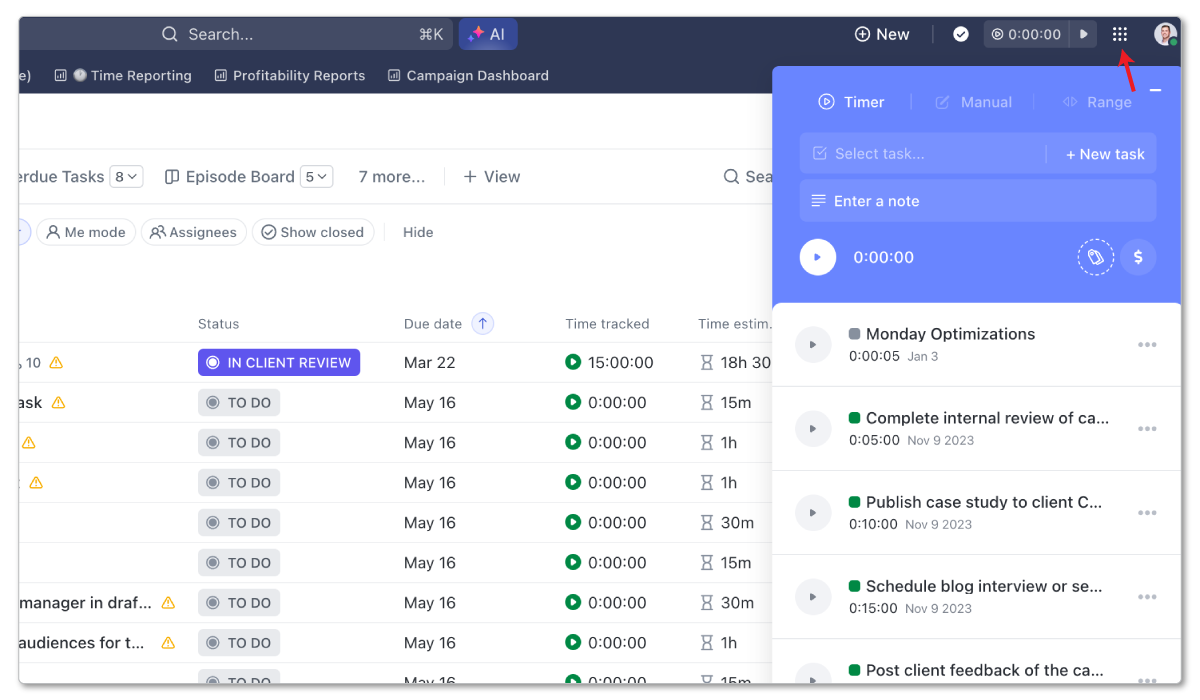
Navigate to your Quick Actions Toolbar (represented by 9 dots in the right corner of your screen) and pin the Track Time option. You can now click on this wherever you are in ClickUp.
This may be better for some, but you will have to search for the Task you’re looking to track time on. That’s why I find it much easier to just work out of your “My Tasks” View.
Three ClickUp Time Tracking Methods
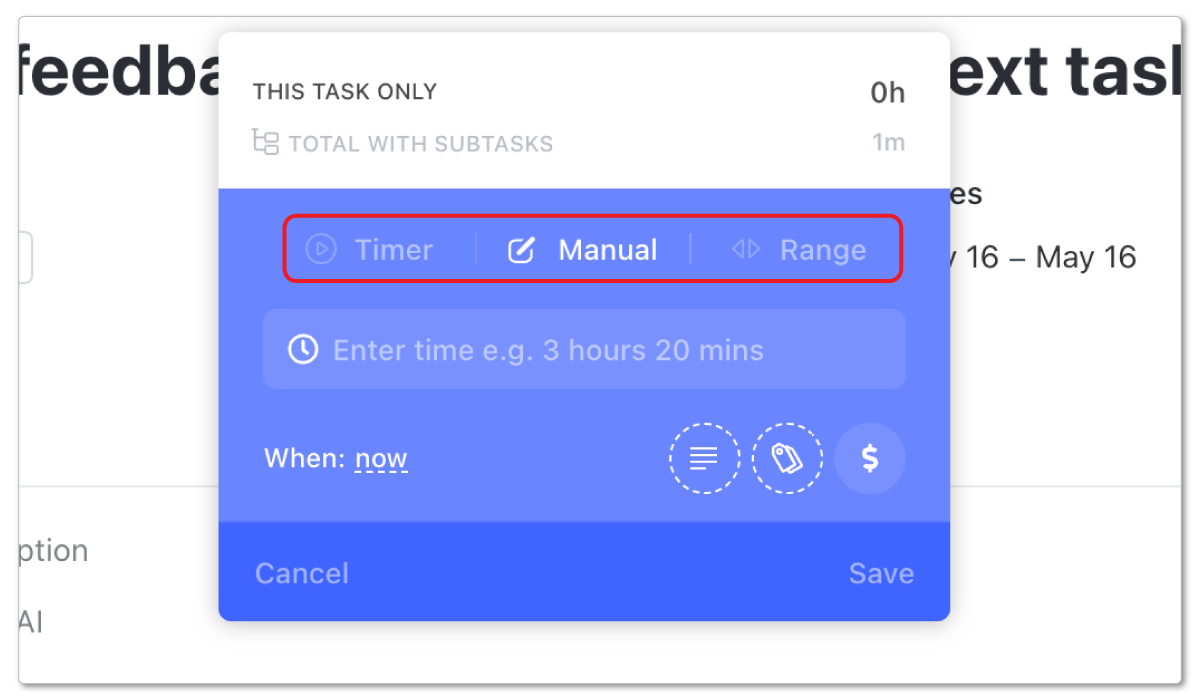
In addition to the three different places to track time, there’s also three different methods of tracking time - timer, manual, or range.
Timer: The timer provides the most accurate time tracking data. You can start a timer when you begin working on a task, and stop it when you stop. You’ll get data down to the second instead of just the minute, but you obviously have to be good about stopping your timer when you’ve completed a Task.
Manual: You can also type in your time manually. If you forgot to start a timer, were looking at the clock, or you tracked time on a different device, you can type in the duration - like “20 minutes”- when you’ve completed the task.
Time Range: Similar to manual, you can also choose to enter a start and end time like 9:45am to 10:15am and ClickUp will calculate the duration.
Recommendation: Use Timer + Manual Time Tracker as Needed
While all three methods have their place, for the most accurate time data, I recommend you encourage the use of timers whenever possible and leverage manual entry if gaps need to be filled. This will provide you with “down to the second” time data for the most accurate measure of where time went.
This all depends on what your business needs, though. If you don’t need that granular level of data, manual entry or the range will work just fine.
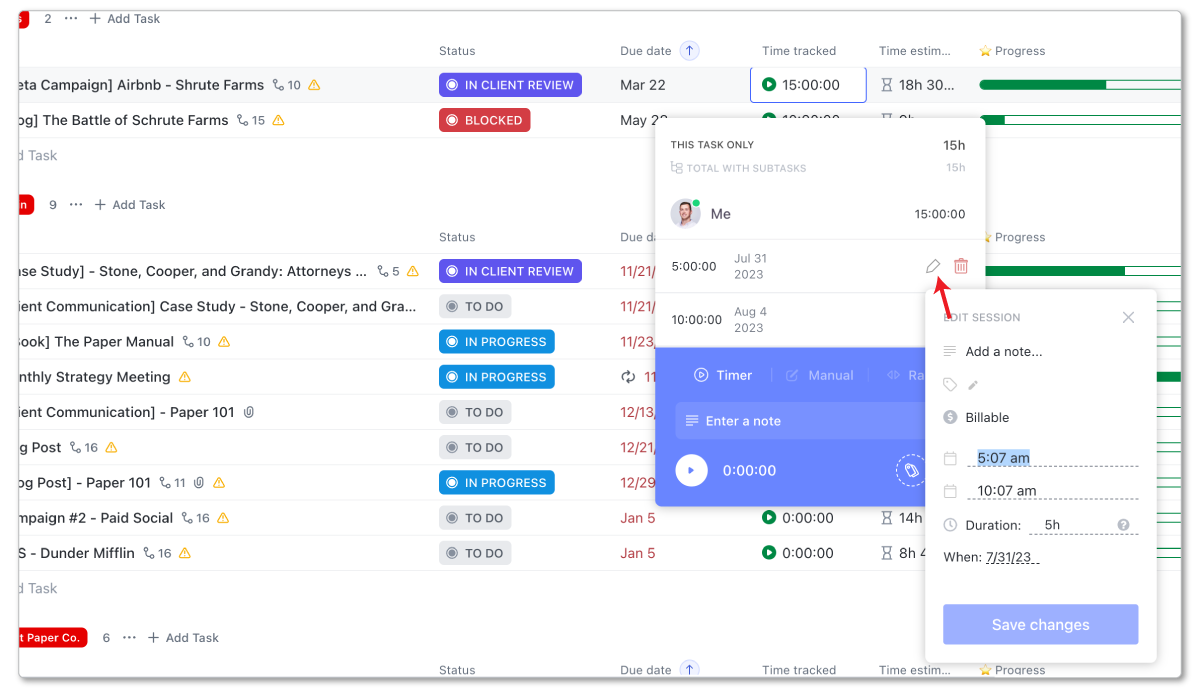
And lastly, if someone forgets to stop their timer (which happens frequently), or accidentally types in an inaccurate time entry, you can always edit time entries in ClickUp. To do this, click on your time entry, select the “pencil” icon and edit the entry. Follow the graphic below.
Download the Complete “How to Use ClickUp” Guide
Get the complete 56-page guide to learn how ClickUp’s #1 Solutions Partner uses ClickUp.
Get Instant Access →Step 4: Encouraging Healthy Time Tracking Habits
When tracking time in ClickUp, the important component is the *Hierarchy. *The Hierarchy will help categorize time entries.
But a close second important component to tracking time is your team’s time tracking habits. This can be a struggle for a lot of teams when they start to track time. If your team hasn’t done it before, there’s a chance that it’ll take some time before they fully adopt your new ask of them.
Here’s a few tips to get your team tracking time in ClickUp.
1. Make Time Tracking Easy
Time tracking doesn’t have to be difficult.
It’s only difficult when your team has to cross over multiple platforms and systems. The more friction added to the time tracking process, the more likely it is that your team won’t track their time (duh!).
The beauty of tracking time in ClickUp is that it can be the one tool that your team uses to see their work, complete their work, communicate with the team, and track their time. This is why we recommend you have a “My Tasks” View for everyone in your ClickUp Workspace.
This View will house their Tasks and be where they track their time. If they live in this View and can do almost everything there, you’re minimizing the friction when it comes to tracking time.
Yes, it’ll take some time to build the habit, but this is a great start.
2. Set Goals and Hold the Team Accountable
Secondly, before you tell the team to start tracking time, set some goals and expectations. Clarity is always kindness.
Hundreds of teams we’ve worked with set weekly time tracked goals.
You can start with 60% of time being tracked in week 1, 70% of time being tracked in week 2, 80% of time being tracked in week 3, and so on…
Most often, billable work is a non-negotiable for tracking time, but you can ease your team in to tracking time on their internal tasks.
Set a goal and hold your team accountable to that goal. Thankfully, you’ll have ClickUp Dashboards (which we’ll dive in to next) to help with this.
3. Reward Good Work
Should you use the carrot or the stick?
Most often, it’s a combination of both, but I’d lean towards the carrot for this one.
As your team starts to track time, I recommend that you reward those who are tracking their time in full. Run competitions and shout out time-tracking winners in a Slack channel. Always encourage and promote healthy habits.
Do this for a quarter or so, but at some point, tracking time just has to be the norm and non-negotiable. You can’t always reward team members for just doing their job.
If someone still can’t seem to track time, have a conversation with them. If they simply don’t want to track their time, they may not be a culture fit.
4. Discuss the Why
It’s always important to tell your team why they need to track their time. Most often, team members who’ve never tracked time before may think of it as a punishment and a way for you to see where they spend every second of their working hours.
But in reality, this is not always the case. Yes, that data can be useful, but you need to explain the “why” behind your request.
Time data is necessary to show you how profitable your business, services, and projects are.
Additionally, time data can help tell you how long tasks take, helping provide better estimates in the future - which is a win for your clients and a win for your team.
Better time estimates lead to a clearer view of workload and capacity, which leads to a team that is utilized properly and not overworked or underworked. Your team will appreciate this.
Step 5: ClickUp Time Tracking Reports and Dashboards
ClickUp time tracking reports live in two places today: the Time Reporting Dashboard that shipped with the 4.04 time tracking overhaul in May 2026, and the customizable time tracking cards you can add to any ClickUp Dashboard.
For years, reporting was the weakest part of ClickUp’s time tracking story. You could collect great time data and then fight to get anything useful back out of it. The 4.04 release changed that in a big way. We walked through everything in our ClickUp Weekly breakdown of the 4.04 time tracking overhaul, but here’s the short version.
What the Time Reporting Dashboard Covers
The Time Reporting Dashboard gives you native time reports without assembling them yourself from list views and exports. You can filter time reporting by team and group entries by tag or task, then review and correct timesheets in the same place. The overhaul also cleaned up the workflow around reporting: lighter CSV exports of time cards for billing, time entry deletion logs in task activity, and easier time entry corrections directly in timesheets.
Beyond the Time Reporting Dashboard, ClickUp Dashboards still do plenty of heavy lifting. Time tracking cards let you slice tracked time by Space, Folder, List, person, or date range. This is exactly why the Hierarchy work in Step 1 matters so much - the cards are only as useful as the structure underneath them.
The Three Reports Ops Teams Actually Need
Once the data is flowing, most ops leaders are really after three reports:
- Utilization by team - how much of your team’s capacity is going to billable work
- Delivery margin by client - which clients and engagements are actually profitable
- Hours vs estimate variance - where actual time is blowing past what you scoped
These are the reports that tell you whether the business is healthy, and they’re the three ClickUp doesn’t surface natively. We dug into all three in our ClickUp Weekly episode on utilization and profitability reporting.
What ClickUp Handles Natively vs Where Gaps Remain
ClickUp handles the collection side well: timers, timesheets, time tracked vs estimated on individual tasks, team-level time reporting, and exports. If you want to see where time went last week, you can get that answer in ClickUp today.
The gaps show up when you need the business-level math. Utilization percentages against real capacity, delivery margin that factors in cost and billing rates, and variance rolled up across clients all still require exporting data and building spreadsheets on the side.
That’s the gap we’re building ZenPilot Reports to close: utilization, delivery margin, and hours vs estimate dashboards built on the ClickUp data your team already tracks. The beta waitlist is open now.
One more thing worth watching: ClickUp’s time tracking team has confirmed that AI and agent-driven time tracking is coming, meaning Brain and agents will be able to log time on behalf of users. If you’re mapping out what AI can already do in your workspace, our ClickUp AI guide covers it.
And a final reminder: if your team isn’t tracking their time consistently, the tech is rarely the blocker. Habits and change management are. Go back to Step 4 before you touch another Dashboard setting.
Frequently Asked Questions
Does ClickUp have built-in time tracking?
Yes. ClickUp includes native time tracking on all plans - including the Free plan. You can start a timer, enter time manually, or log a time range directly on any task. No third-party integration is required to start tracking time in ClickUp.
Is ClickUp time tracking accurate?
Yes. ClickUp’s timer tracks down to the second, and you can manually adjust any time entry after the fact if someone forgets to stop a timer or logs an incorrect duration. Accuracy ultimately depends on your team’s habits - if they use the timer consistently and correct mistakes, the data will be reliable.
Can you run time reports in ClickUp?
Yes. ClickUp offers time reporting widgets on Dashboards, plus the new Time Reporting Dashboard that shipped with the 4.04 release. These let you see time tracked by space, folder, list, user, or date range, compare time tracked vs. time estimated, view timesheets, and break down time data by client, project, or team member. Plan availability has shifted with recent releases, so check ClickUp’s current plan comparison to confirm what’s included on your plan.
Should agencies use ClickUp’s native time tracking or a third-party tool?
For most agencies, ClickUp’s native time tracking is sufficient - it covers timers, manual entry, billable/non-billable tagging, and dashboard reporting. If you need advanced invoicing, expense tracking, or approval workflows, a dedicated tool like Harvest or Toggl may be worth integrating. But tracking natively in ClickUp reduces friction and keeps everything in one place.
Want Help Getting Time Tracking to Stick?
Time tracking is one of those things that only pays off when the whole system works: the hierarchy, the habits, and the reports. Get all three right and you finally have profitability and utilization numbers you can trust.
That’s the job at ZenPilot. We look at how your team runs ClickUp today, show you exactly what to fix, and help you roll out the fixes in a way your team will adopt instead of ignore.
If you want that kind of look at your workspace, book a free 30-minute call. Worst case, you walk away with a shorter list of things to worry about.