How to Best Leverage ClickUp's Gantt Chart
How much time do you spend a week managing project timelines, adjusting due dates, and scheduling work? For some project managers, this may take up a large part of their day.
Yes, this is always going to be apart of a project manager’s daily routine. But, what if I told you there was a way to cut this time in half so that you could focus more on deep work, team building, and maybe a few extra minutes to catch some sunshine on your lunch break. ☀️
ClickUp’s Gantt chart/view can save you hours per week when it comes to adding due dates, remapping projects, and ensuring rescheduled work doesn’t fall on the weekends.
Let’s take a quick tour of the Gantt chart, discuss the benefits, and then dive in to how to best leverage Gantt.
An Overview of ClickUp’s Gantt Chart (or View)
The Gantt view is no different than any other view in ClickUp in terms of creation, settings, features, etc.
If you’re new to ClickUp, I suggest you begin by reading our Beginners’ Guide to ClickUp Views, to walk you through the basics - creating views, editing views, filters, settings, columns, etc.
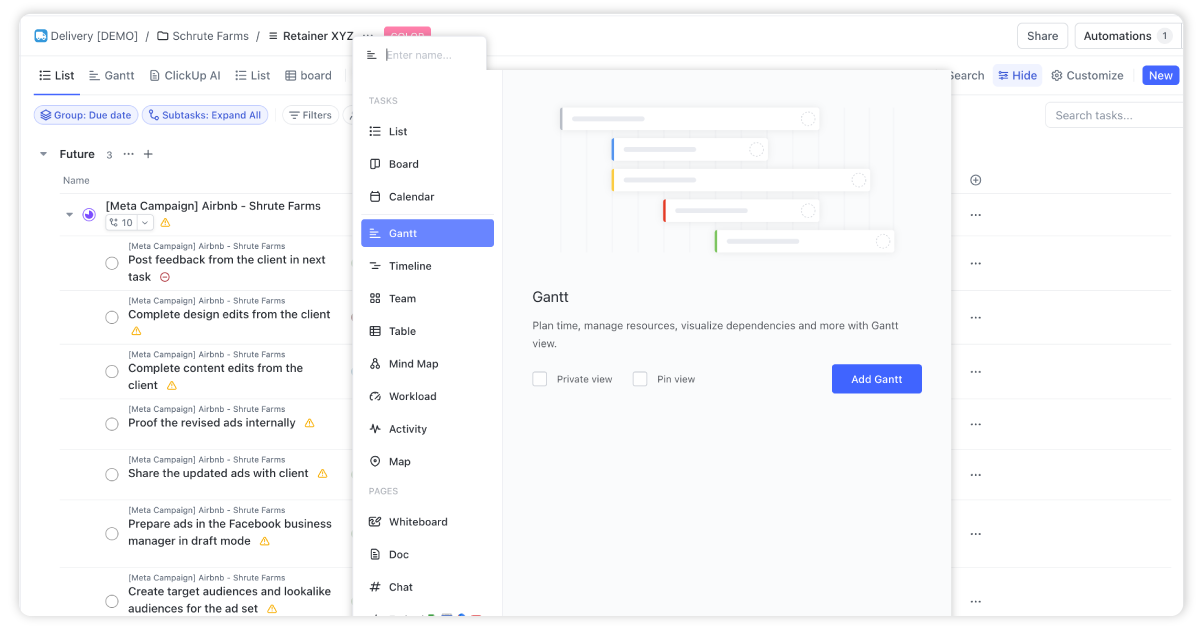
But, since you’re here, let me give you the rundown of the most important components to the Gantt view.
- Filters - Your filters are where you can choose to hide or show tasks that have certain custom fields, assignments, or statuses. I’d recommend you leave your Gantt views unfiltered to give us a nice birds-eye view of projects.
- **Tasks - **You’ll be able to see all of your task names on the left hand menu within the Gantt. You have options to add additional columns to this view, but I’d leave it basic to not take up space.
- Date Map + Dependencies - In the main space within the Gantt chart, you’ll have an awesome spot to add in due dates and dependencies, remap due dates, and skip the weekends.
- **Settings - **This will be important because you’ll have the options to both reschedule tasks with your dependencies, and the option to show or hide weekends.

The Benefits of The Gantt View
Before we dig into our Gantt view use-cases, let’s take a step back to understand why the Gantt view is so valuable for teams using ClickUp.At its core, the Gantt view provides a visual timeline of tasks and projects. This allows teams to map out schedules and see the big picture at a glance.Some key benefits include:
- Schedule projects thoroughly - Plan out realistic timeframes for each stage of a project. Ensure sufficient time for client reviews and revisions.
- Manage dependencies - Visually sequence tasks that have dependent relationships.
- **Shift deadlines easily **- Reschedule projects by dragging and dropping tasks on the Gantt chart.
- Avoid weekend work - Auto-shift delayed tasks from weekends to weekdays.
- Streamline workflows - Create templates with due dates and dependencies baked in to replicate.
- Work smarter - Make better resource and scheduling decisions when you can visualize timelines.
Overall, the Gantt view can significantly boost the productivity of your project managers who spend a bulk of their time remapping and readjusting projects.
BONUS
Download the Complete ClickUp for Agencies Guide FREE
The 47-page guide includes graphics, checklists, and links to how-to videos so you can actionize your ClickUp plan.

The Top Two Ways to Leverage ClickUp’s Gantt View
The Gantt view essentially provides a command center for teams to control projects. Let’s look at how to tap into its capabilities.
1) Create Due Dates and Dependencies for Process Templates
The first way to maximize the Gantt view is to build due dates and dependencies into your reusable process templates.These templates act as playbooks that map out the stages and steps required to complete common projects like social media campaigns, blog posts, email nurturing sequences, etc.
For more information on leveraging ClickUp templates, and building out your processes, I’d suggest you read our ClickUp for Agencies Guide.
Step #1: Map Out Task Stages
Start by mapping out the stages a project will move through from start to finish.
For a blog project, this could involve stages like:
- Research topic
- Interview client
- Write first draft
- Create graphics
- Send draft to client for feedback
- Incorporate client edits
- Final review and approval
- Publish post
Step #2: Add Due Dates
Next, add realistic due dates to assign timeframes for each task or stage.Rather than tediously entering due dates individually in the List view, you can quickly assign them in the Gantt view. Just click on each task and schedule it out chronologically.The specific dates aren’t too important, since these will be remapped when the template is used. Maintaining the relative distances keeps timeframes realistic.
Step #3: Set Up Dependencies
Now set up dependencies between stages to sequence the workflow. Click and drag tasks in the Gantt View to link dependent stages.Dependencies create the critical path to keep projects flowing smoothly. And they help you remap due dates in the future (but more on that later).
Step #4: Create Reusable Templates
When your template has tasks, due dates, and dependencies mapped out, save it as a reusable template.Now when you kick off a new blog project, simply use the template. The due date placeholders get remapped to real dates, while the task dependencies remain intact.This saves agencies enormous time compared to rebuilding project plans from scratch every time. Your team can deliver work faster using these pre-built process templates.
2) Reschedule Projects and Skip Weekends
Another Gantt view superpower is the ability to rapidly reschedule projects when delays arise.It can be difficult to predict project timelines 100% accurately, especially with external stakeholders. When the unexpected happens, the Gantt view lets you easily shift deadlines rather than blow them.
For this to work, just make sure you click “Customize” in your Gantt view and turn on both, “Reschedule dependencies” and “Hide and skip weekends”.
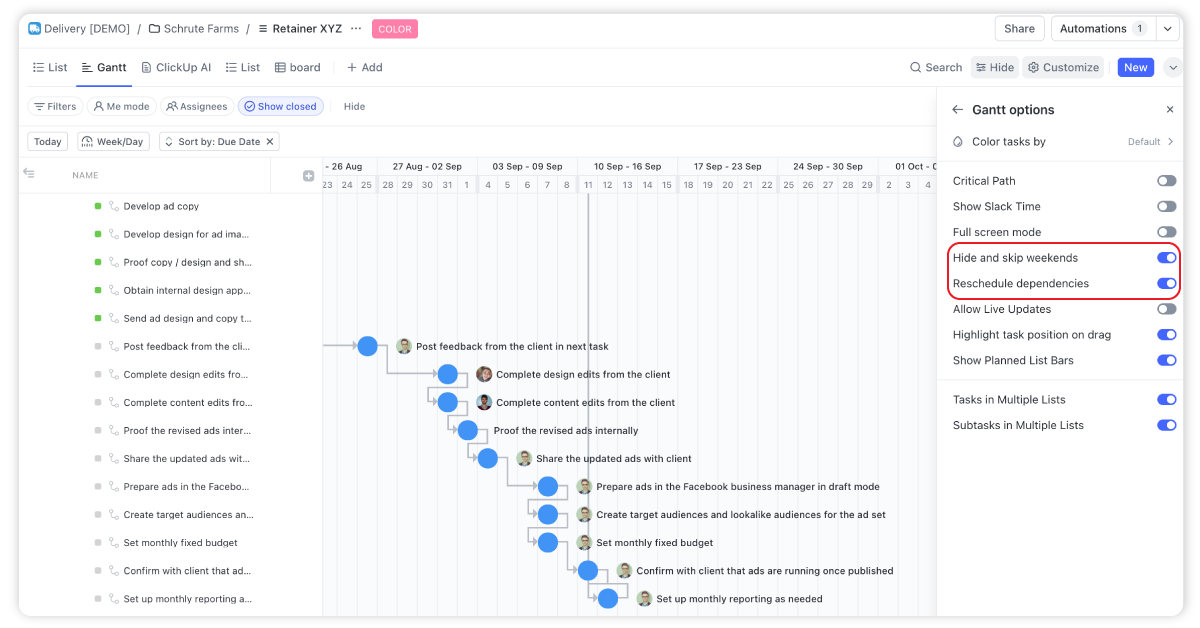
Reschedule Entire Projects
Say a blog project gets held up waiting for client feedback. Simply grab the parent task in the Gantt View and drag left to push back all the downstream due dates at once.The dependencies you set up rearrange subsequent tasks automatically based on the new parent task date. No tedious manual editing required!
Skip Weekends to Optimize Schedules
As you’re shifting deadlines, enable “hide and skip weekends” to optimize the schedule.This prevents resources from being scheduled on Saturdays or Sundays. Any task ending up on a weekend will automatically rollover to Monday.
This is big. Don’t schedule work for your team on the weekends if you want to avoid team burnout.
Final Thoughts
There’s two easy ways you can instantly boost your team’s productivity inside ClickUp.
And this is just the beginning. If you want to continue to build a more productive, profitable, and healthy team inside ClickUp, you need to: